 |
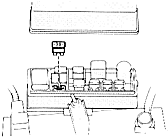
- Raise the headlights and turn the lights off with the headlights raised. Then pull out the "RTR 30 A" fuse.
| CAUTION:
Unless power is disconnected, there is a danger of the headlights suddenly retracting and causing injury. |
|
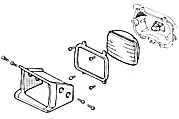 |
- Loosen the ornament screws and remove the ornament. Loosen the retainer screws and take out the beam unit together with the retainer, unplugging the connector. Remove the rubber cover.
If the connector is tight, wiggle it.
NOTICE:
Never attempt to loosen the headlight aim adjusting screws.
|
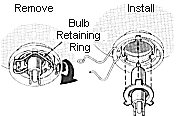 |
- Release the bulb retaining spring and remove the bulb. Install a new bulb and bulb retaining spring.
To install a bulb, align the tabs of the bulb with the cutouts of the mounting hole.
Bulb Selection
Use a bulb with a 60/55 W (H4).
NOTICE:
Only use a bulb of the specified type above.
Do not touch the glass part of the bulb with bare hands. If you do, clean the glass with alcohol and a clean rag.
|
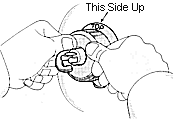 |
- Install the rubber cover with the "TOP" mark upward. and snuggle onto the boss.
Make sure the rubber fits snugly on the bulb base and the mounting body.
|
 |
- Install the unit with the "TOP" mark on the glass upward, plugging the connector. Put the retainer on the unit, tighten the screws and install the ornament. Put back the fuse.
After replacement, have the headlight aim checked by your Toyota dealer.
|