THINGS TO KNOW BEFORE STARTING YOUR VEHICLE
Remote Keyless Entry
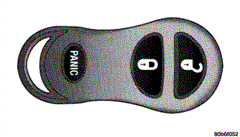 |
This system allows you to lock or unlock the doors and liftgate or activate the panic alarm from distances up to about 23 feet (7 meters) using a hand held radio transmitter. The transmitter need not be pointed at the vehicle to activate the system.
To Unlock The Doors And Liftgate:
Press and release the UNLOCK button on the key fob once, to unlock the driver's door, or twice to unlock all doors and liftgate. The illuminated entry system will also come on.
The system may be programmed to unlock all the doors on the first press, using the following procedure:
- Close all the doors.
- Place the key in the ignition and turn the key between the OFF and ON position consecutively for a total of four times, ending in the ON position (do not start the engine).
- Press the driver's side power door lock switch to unlock the doors and again within 30 seconds to lock the doors.
- You will hear a single chime when programming is completed.
- To activate the feature again, repeat the above steps.
To Lock The Doors And Liftgate:
Press and release the LOCK button on the key fob to lock all doors and liftgate. The horn will chirp once to acknowledge the door lock signal. The horn chirp feature is shipped activated and if desired, the feature cna be turned off and on, by following these steps:
- Place the key in the ignition and turn the key to the ON position (do not start the engine).
- Press and hold the UNLOCK button on the transmitter for four to ten seconds.
- While the UNLOCK button is pressed, press the LOCK button on the transmitter and then release both buttons.
- You will hear a single chime when programming is completed.
- To activate the feature again, repeat the above steps.
Using The Panic Alarm
To turn on the panic alarm feature, press and release the PANIC button. When the panic alarm is on, the headlights will flash, the horn will pulse on and off.
The panic alarm will stay on for 3 minutes unless you turn it off by pressing the PANIC button a second time, or by starting the vehicle and accelerating to 15 mph or greater.
General Information
This device complies with FCC rules part 15. Operation is subject to the following two conditions:
- This device may not casue harmful interference.
- This device must accept any interference that may be recieved, including interference that may cause undesired operation.
If your Remote Lock Control fails to operate from a normal distance, check for these two conditions.
- Weak batteries in the transmitter. The expected life of batteries is from one to two years.
- Closeness to a radio transmitter such as a radio station tower, airport transmitter, military base and some mobile or CB radios.
Programming Additional Transmitters
Up to four transmitters can be programmed. When programming a new transmitter, all transmitters intended for use with this vehicle, except the transmitter used to start the programing mode, must be programmed within the 30-second programming mode. To program a transmitter:
- Turn the ignition switch to the ON position (do not start the engine).
- Press and hold the UNLOCK button on a currently programmed transmitter for a minimum of four seconds and a maximum of ten seconds.
- While pressing the UNLOCK button, press and release the PANIC button.
- Release the UNLOCK button and a single chime will sound. This indicates that the module is in programming more.
- Within thirty seconds, press and release the LOCK or UNLOCK button on all transmitters intended for use with this vehicle, except the transmitter used to start the programing mode. Successful programming will be indicated by a single chime
If you do not have a programmed transmitter, contact your dealer for deatils.
NOTE: When programming mode is entered, existing remotes will be de-programmed, and will need to be reprogrammed.
Battery Replacement
The recommended replacement battery is 2016.
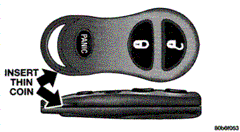 |
- With the transmitter buttons facing down, use a flat blade to pry the two halves of the transmitter apart. Make sure not to damage the rubber gasket during removal.
- Remove and replace the batteries. Avoid touching the new batteries with your finders. Skin oilds may casue battery deterioration. If you touch a battery, clean it with rubbing alcohol.
- To assemble the transmitter case, snap the two halves together.